Unity Bindings
Tangible engine enables users to take advantage of specially engineered physical objects that can be recognized by Ideum touch-enabled products. The objects, called tangibles, are made of conductive material that mimics touches on the surface of a p-cap display. On the software end, the Tangible Engine is a windows service that runs in the background, awaiting the connection of client apps that require tangible recognition capabilities. A service model was chosen to enable Ideum to create and deploy fixes and new features without requiring clients to rebuild their own apps. The unity bindings use a TCP socket to communicate with a locally running service.
Setting up the Engine
First, start by importing the TE library and associated files by locating the unitypackage file at C:\Program Files (x86)\Ideum\Tangible Engine 3.0\Bindings\Unity.
This class is designed to operate as a singleton, so the primary way of accessing it should be through the call TangibleEngine.Instance. If the engine is not initialized or added to the scene, it will be when that property is invoked for the first time. On the contrary, if this property getter is invoked and there is a TangibleEngine MonoBehaviour attached to an active GameObject instance in the scene, it will be used as the singleton instance.
There is also a prefab, which can be found at TangibleEngine/Resources/
TE.TangibleEngine. Putting this in your scene enables you to reference the TangibleEngine component directly, as well as giving you the ability to change some of the configuration options. There are two sets of properties, one for the editor, and one for runtime. Changing these properties allows one to enable or disable logging as well as switching between the service or simulator modes of operation.
By default, the editor mode will utilize the simulator (which does not require the TE service to run). The intent of this mode is to provide developers with a method of testing the TE API without requiring a touch screen, a trained profile for that screen, and a set of tangibles.
The runtime mode will default to using the TE service which requires a supported Ideum touch screen, a profile, and a set of tangibles. This can be changed easily by modifying the value on the TangibleEngine component, either in the scene or by updating the prefab directly.
Interfacing with the Engine
Here are two methods of getting data from Tangible Engine: Events and Interfaces. The decision to implement both types of subscription models was to accomidate different styles of coding. For example,
  public class EventDemo : MonoBehaviour {
    void Start() {
      TangibleEngine.OnTangibleAdded += HandleOnTangibleAdded;
      TangibleEngine.OnTangibleUpdated += HandleOnTangibleUpdated;
      TangibleEngine.OnTangibleRemoved += HandleOnTangibleRemoved;
      }

    void OnDestroy() {
      TangibleEngine.OnTangibleAdded -= HandleOnTangibleAdded;
      TangibleEngine.OnTangibleUpdated -= HandleOnTangibleUpdated;
      TangibleEngine.OnTangibleRemoved -= HandleOnTangibleRemoved;
    }

    private void HandleOnTangibleAdded(Tangible obj) {}

    private void HandleOnTangibleUpdated(Tangible obj) {}

    private void HandleOnTangibleRemoved(Tangible obj) {}
  }
is effectively the same as:
  public class InterfaceDemo : MonoBehaviour, IOnTangibleAdded, IOnTangibleUpdated, IOnTangibleRemoved {
    void Start() {
      TangibleEngine.Subscribe(this);
    }

    void OnDestroy() {
      TangibleEngine.Unsubscribe(this);
    }

    public void OnTangibleAdded(Tangible t) {}

    public void OnTangibleUpdated(Tangible t) {}

    public void OnTangibleRemoved(Tangible t) {}
  }
There are also other events and interface equivalents pertaining to the state of the engine:
OnEngineDisconnectedOnEngineFailedToConnect
Simulator mode
To make authoring applications with Tangible Engine easier, we have included a Simulator Mode that can be used in the Unity Editor or at runtime. This allows you to author and test your application without needing to connect to the Service and train tangibles specifically for your development machine. It works by adding a button to your scene in the top left corner that, when pressed will create a digital tangible that you can move around the screen, place down or lift up, rotate, and select ID.
In order to enable the Simulator mode, you must have an instance of the Tangible Engine script in your hierarchy attached to a GameObject. In the inspector for that script will be two arrow menus: "Editor Properties" and "Runtime Properties" as show below.

Selecting Simulator in either editor or runtime will tell the program not to look for the Tangible Engine Service and instead wait for the creation of the digital tangibles. Included in the Resources folder is a TE.Profile file that is used as a default profile for the simulator. Below is an image of the application running in editor while in Simulator Mode.
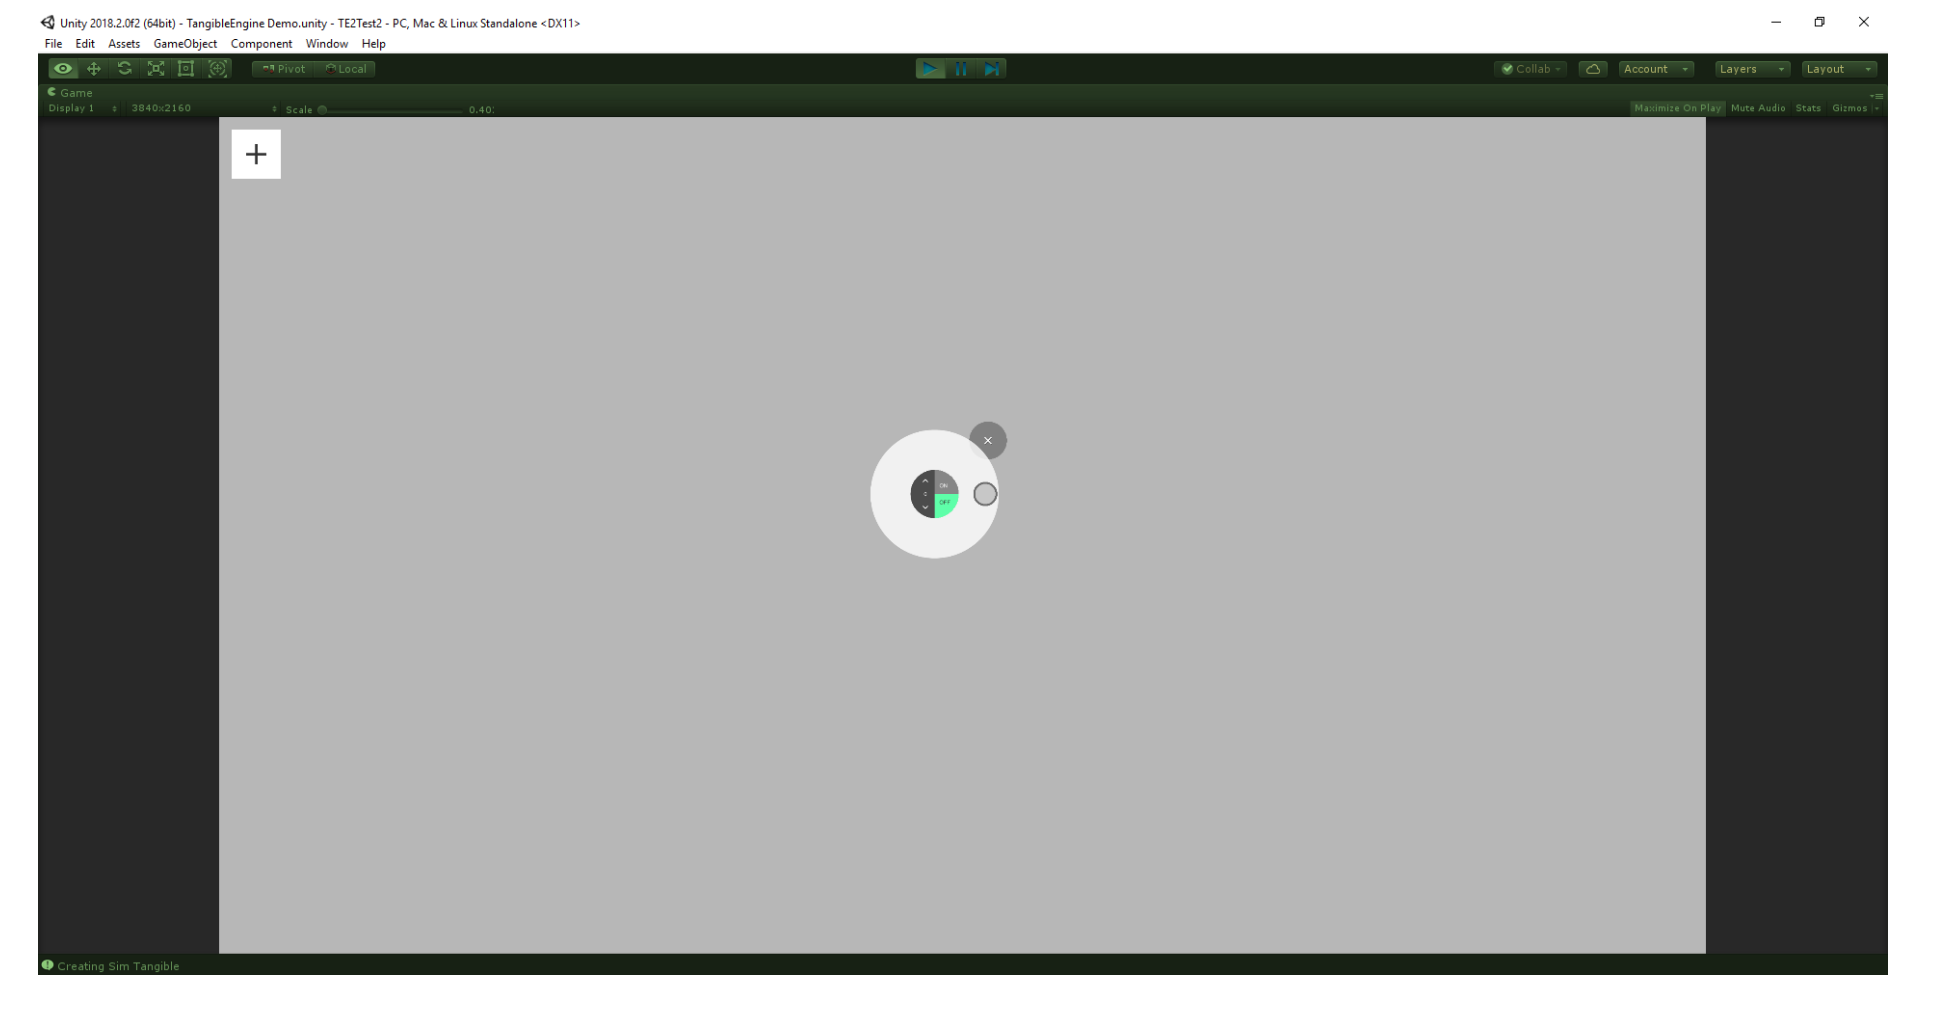
The Plus button in the top left allows you to add a digital tangible. The object in the middle of the sceen is a digital tangible and includes the following:
- On/Off toggle to simulate placing the tangible down on the table and lifting it up.
- A rotation handle, to rotate the tangible.
- An ID field with up and down arrows.
- A close button to remove the digital tangible.
When the On/Off toggle is set to On, more information about the tangible will appear underneath the object, as if a real tangible were being placed there.
Unity Examples
Example projects and scripts on how to use Tangible Engine can be found at C:\Program Files (x86)\Ideum\Tangible Engine 3.0\Bindings\Unity\TE-Unity-Bindings-Examples.unitypackage.
By dragging and dropping this file into Unity, the files will automatically be imported and you’ll be able to view the many ways that one could write an application that uses tangible objects.
Updating Bindings
To update an existing Unity application to the newest TE Unity bindings, simply remove the TangibleEngine folder from your current project (either deleting it or cutting/pasting it to another directory on your computer) and then drag and drop the newest bindings package into the project.
A dialogue box will appear with a checklist of items to import. Make sure all of the items are checked, and then select “import”.
Note: There’s a possibility that your project will end up with two NewtonSoft.dlls, so just delete whichever one you don’t need.
On application run, the service will print out a log statement in the console to show which version of the bindings is currently installed. If the service is set to “Service” rather than “Simulator”, the application will print out a debug statement saying whether or not the bindings version is compatible with the service version. This will guarantee that you’re always using the appropriate binding release.